If you haven’t already, you will need to format your student data file.
You will need to be logged in to the Online Barcode Ordering system before you can place an order.
Begin your Order
I. If this is the first time you have placed an order, you will only see one option - Start New Order – Blank Form.
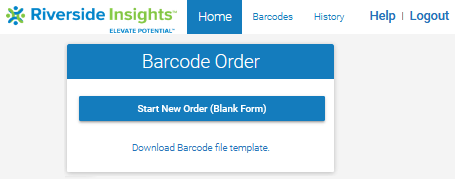
II. If this is not the first time you have created an order, you will see an additional option - Start New Order – Prepopulated Form.

III. If you have experienced problems when trying to load your file and you have contacted customer support, then you should see a third option - Upload New File to Current Order. (see above screenshot)
Placing an order on the Online Barcode Ordering system is easy. The process outlined below assumes this is the first time you are placing an order.
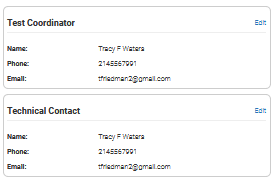
Step 1 – Contact Information
Here, you will need to enter the name, phone number and email address for both the test coordinator and the technical contact.

Step 2 – Test Date and Location
Here, you will need to specify the location and date of the test. The specific fields that need to be complete are;
· School / System / Group Name
· Street Address, City, State, and Zip Code

***If you need to create labels from a prior test administration,then you will need to write the previous test admin order number on the Purchase Order line. If this does not apply, you can skip to the Test Date field***
In the field titled Test Date, use M-D-Y format. (The system will accept dots or slashes).
Step 3 – Choose Order Details
This step gives you options for customizing the appearance of the barcode labels.
I. Select Order Type – Select one of the two available options.

If you select option two, ‘labels created from a previous test administration’, you will be asked to provide your order ID. If you do not know your order ID, you can contact the customer service team via ChatII. Select Sort Order for Labels – Select the option you wish for your labels to be sorted as when printed.

Step 4 – Select Test Types and Quantities
I. Check the relevant boxes that correspond with the test/grade levels you require the barcodes for. You will only need the name and grade to complete this form.
There is no need or facility to indicate which Form you will be using. Such as 7/8 for CogAT or E, F, or G for Iowa.
II. You will need to enter the number of students who need barcodes, which is equivalent to the total number of students being tested for each individual grade level that will be taking part in the testing.
Next, you will need to enter the number of labels that each student will have to affix to their answer sheet in the ‘labels per student’ row.
- If you are going to be carrying out one test for all students, the number entered should 1.
- If you are going to be carrying out two, such as CogAT and Iowa, the number entered should be 2.

Step 5 – Fields to be Read from the Barcode Labels
There are three potential sources of student data that will be used by the Scoring Center.
I. Student Identification - Data that is bubbled-in on a paper-based answer document by a student before testing.
II. Locations - Building and grade/class header sheets which group the paper-based documents.
III. Fields which are completed within the barcode data file and updated during the barcode ordering stage.

Please note: The student data files are typically created in advance of any test. This means that some of the data could be out of date by the time the test event takes place. This is usually true for locations, which will often change in the initial months of a new school year.
During the scanning process, the data will be taken directly from the barcode labels or from any subsequent coding on the answer documents. However, it cannot be taken from both sources. In this step, you need to indicate the fields that you will be supplying in the barcode data file by checking the box adjacent to the relevant field/s.
If a field is marked on the student answer document but not checked below, this will be read from the answer document.
***Please ensure that any fields you check have been completed correctly in your initial student data file. If you check a box and there is no corresponding data in the student data file, then this field will not scan any data. This means that any information within that field, even if it is bubbled-in on a paper document will be lost ***
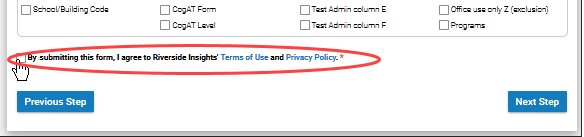
Step 6 – Reviewing the Order
Here, you will see a complete summary of every segment of your order as it has been entered in each of the previous steps. At this point, and from this screen, you can still edit any of the fields, in any of the sections.
Editing any part of your order is simple. In the top right-hand corner of each box, you will see the option to ‘edit’. Simply click to edit, and you will be taken back the relevant step in the order to amend your details. Once complete, click the blue ‘next step’ button until you arrive again at Step 6.
Once you have thoroughly checked your order and you are ready to proceed; you will need to check the box to confirm you agree to the terms and conditions. Then proceed to the next step.
Step 7 – Submitting the Barcode File
Now that you have completed the barcode ordering form and agreed to the terms of use, you are ready to upload the student data file.
Please note: The Last Name, First Name, Date of Birth, Gender, Grade, and School/Building Name fields are required for barcode label creation and MUST be included in the barcode data file.
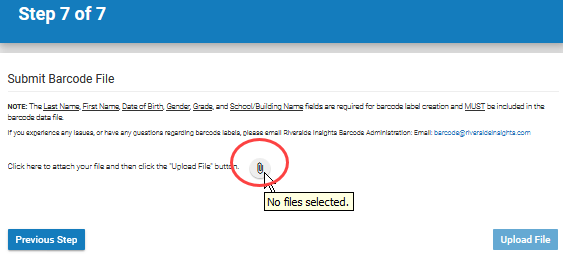
Click on the paperclip to attach and upload the file.
Once the file is successfully added to the system, you will be redirected back to the homepage where you will see a confirmation message.

Once the order has been placed, there are a number of additional features that are possible with the OBO system.
You can select additional options to resume a paused order, view previous orders and print an order. Please click on the links to view the individual instructions for each.
Once you have finished your session, make sure you fully logout of the system.